> ## Documentation Index
> Fetch the complete documentation index at: https://user-docs.seaticket.ai/llms.txt
> Use this file to discover all available pages before exploring further.
# Ticket Configuration
In the Ticket Configuration section, administrators can configure several fields used in ticket management, including Type and Substate.
SeaTicket also supports Tags, a flexible labeling system that can be used across Tickets, External Issues, and Knowledge Base articles.
## Managing Ticket Types
Ticket Types help you classify and organize tickets in a clear and consistent way. Common types include Bug, Feature, Question, and Task.
Using types enables your team to quickly understand what each ticket is about and manage large volumes of tickets more efficiently.
### Accessing Ticket Type Management
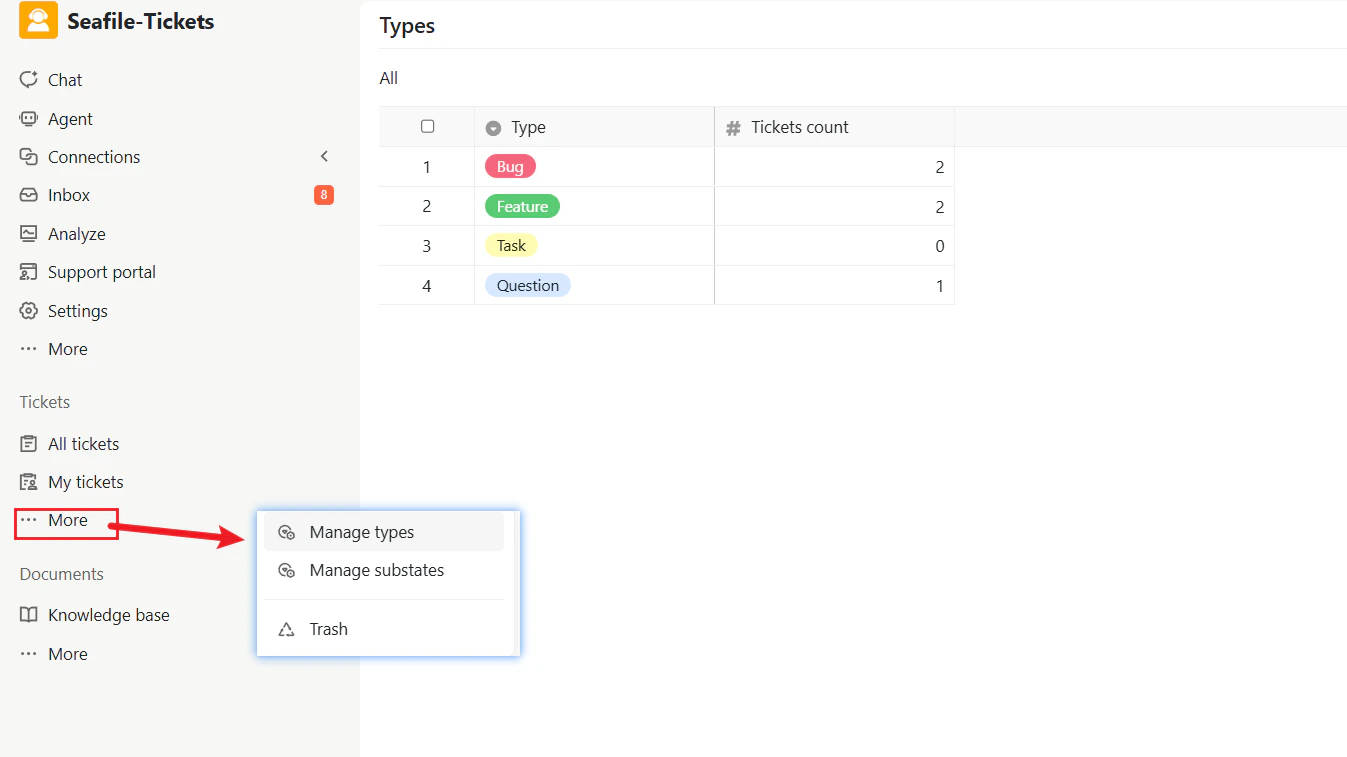
To manage ticket types:
1. Log in to the SeaTicket project workspace
2. In the left navigation menu, click **More** under the **Tickets** section
3. Select **Manage types**
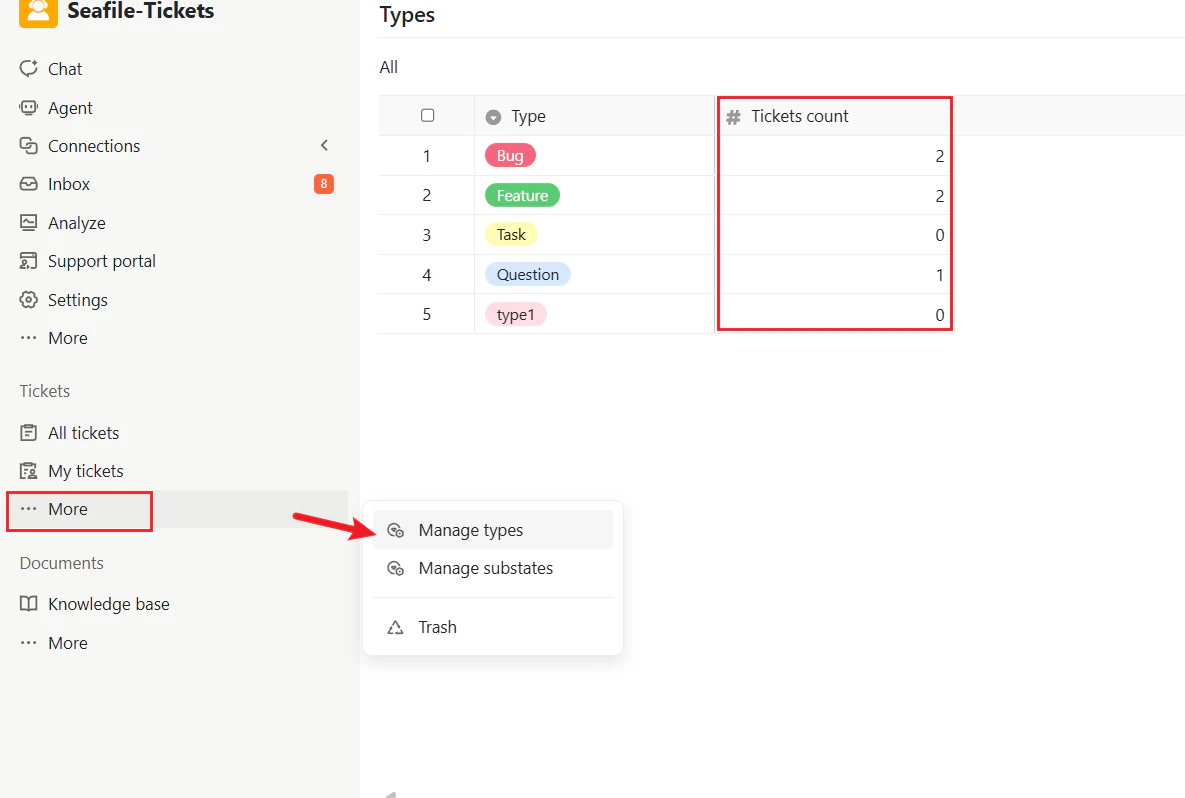
You will be redirected to the Types page, where all existing ticket types are listed.
 ### Creating and Deleting a Ticket Type
Admins can create a set of ticket types that responders**** can manually select when customers create new tickets or when handling existing ones.
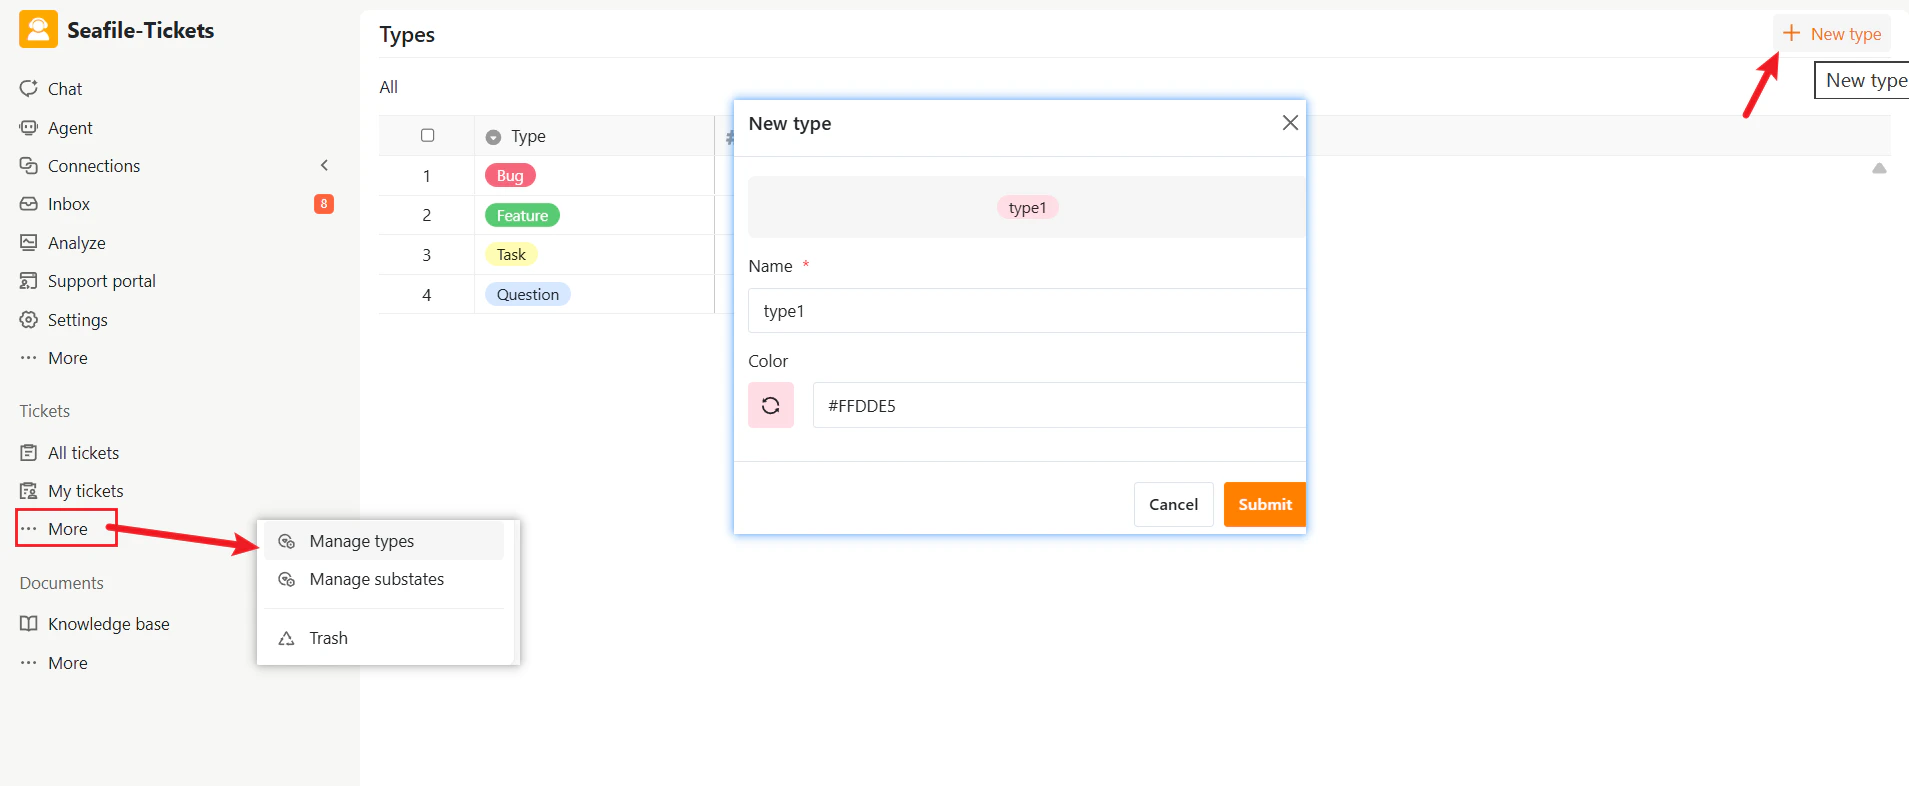
**To create a type:**
1. Go to the Types management page
2. Click **+ New type** in the top-right corner
3. In the pop-up window, provide the following information:
* **Name** – The type name (e.g., Bug, Task, Feature)
* **Color** – A color label for visual identification
4. Click **Submit** to save the new type
The new type will be immediately available for all tickets.
### Creating and Deleting a Ticket Type
Admins can create a set of ticket types that responders**** can manually select when customers create new tickets or when handling existing ones.
**To create a type:**
1. Go to the Types management page
2. Click **+ New type** in the top-right corner
3. In the pop-up window, provide the following information:
* **Name** – The type name (e.g., Bug, Task, Feature)
* **Color** – A color label for visual identification
4. Click **Submit** to save the new type
The new type will be immediately available for all tickets.
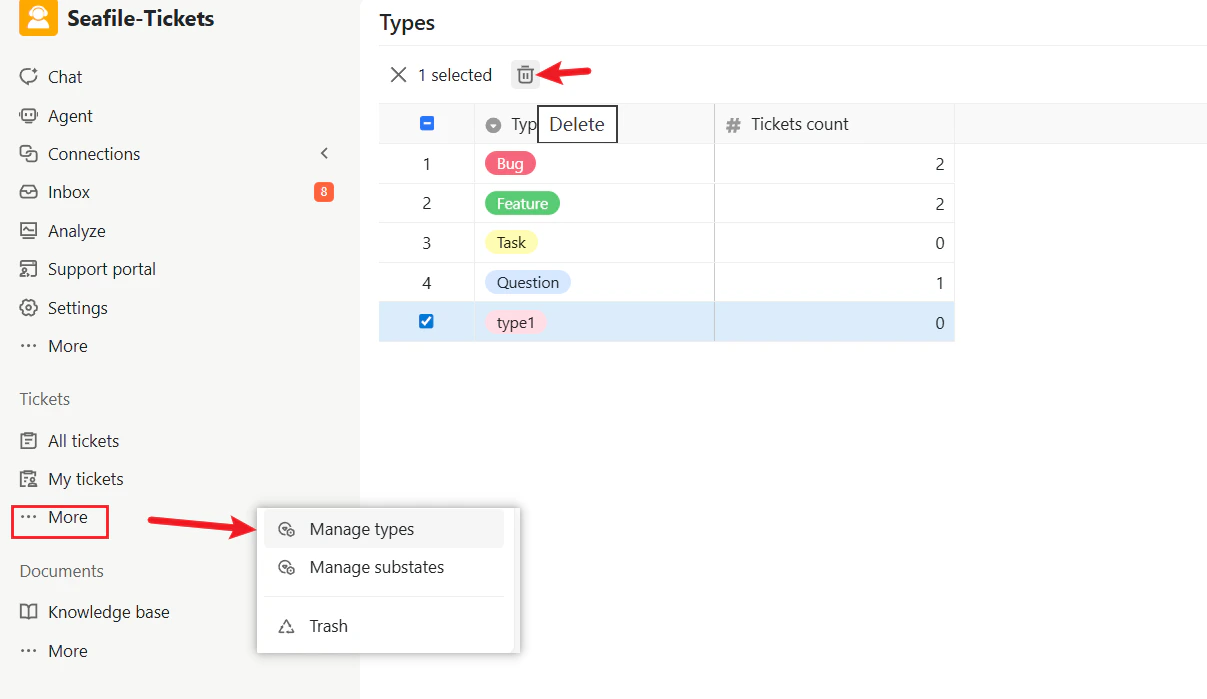
 **To delete a type:**
1. Select one or more types from the list
2. Click the Delete (trash) icon at the top
**To delete a type:**
1. Select one or more types from the list
2. Click the Delete (trash) icon at the top
 ### Assigning a Type to a Ticket
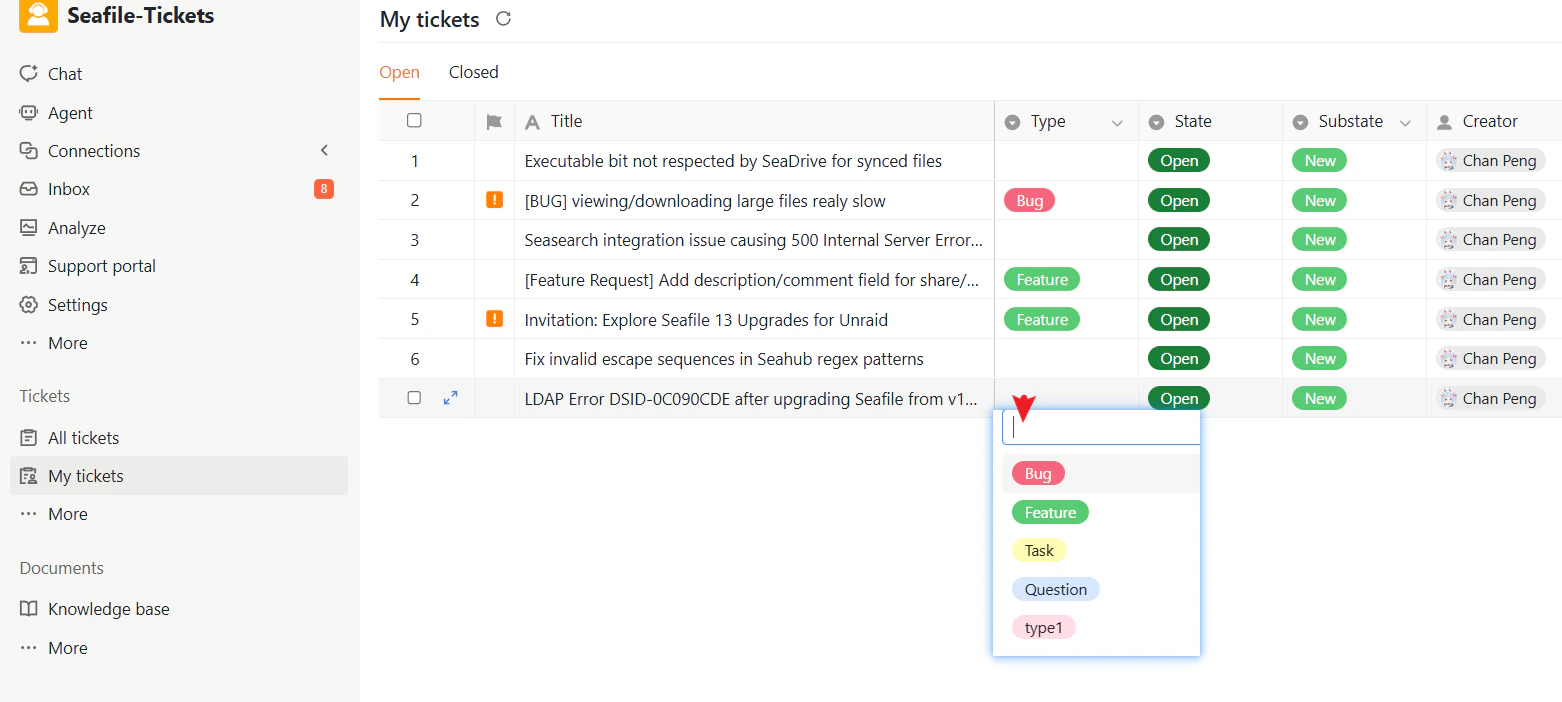
Each ticket can be assigned one type.
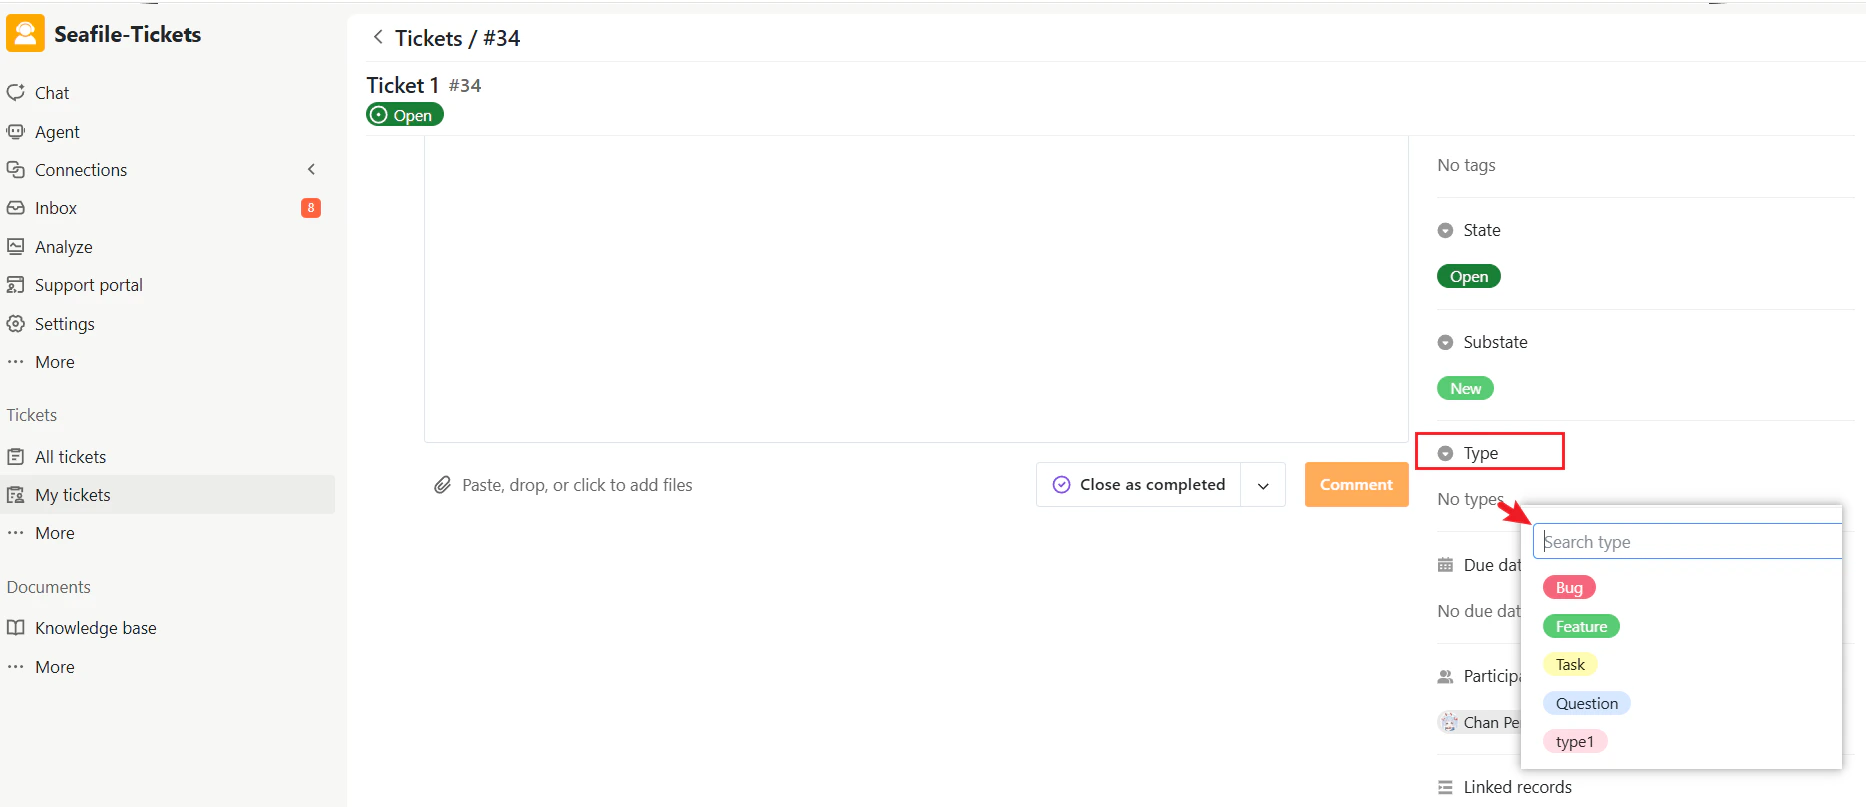
In the ticket view or on the ticket details page, click the **Type** field and choose a type from the list. The selected type will be displayed as a colored label on the ticket.
### Assigning a Type to a Ticket
Each ticket can be assigned one type.
In the ticket view or on the ticket details page, click the **Type** field and choose a type from the list. The selected type will be displayed as a colored label on the ticket.
 ### Filtering Tickets by Type
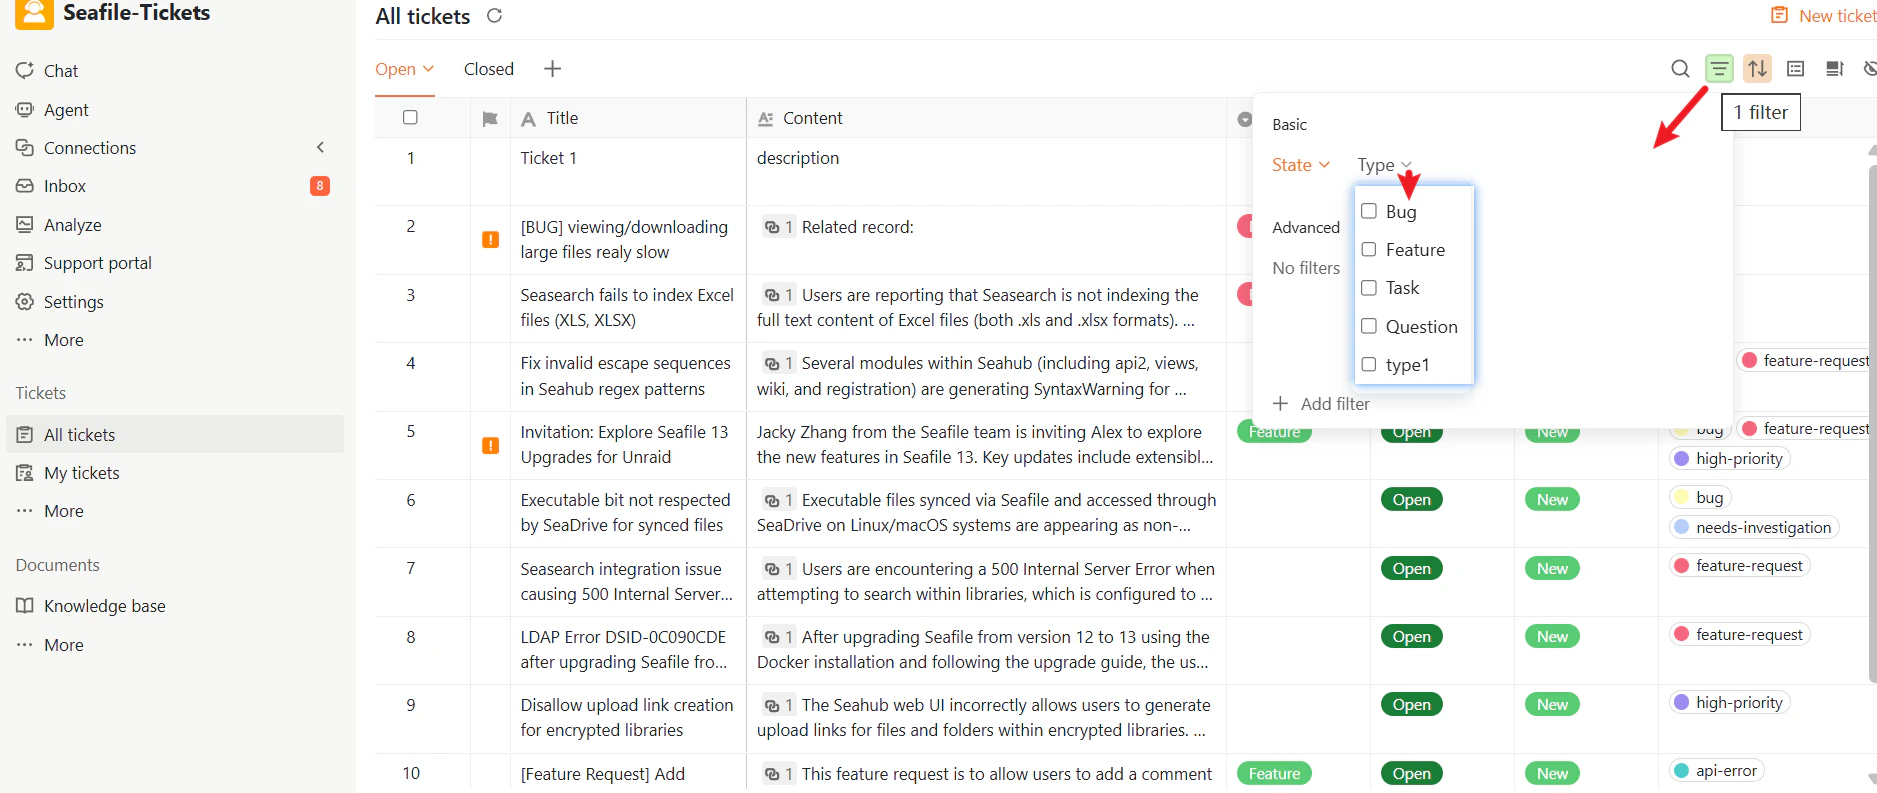
Ticket Types can be used as a filtering condition to quickly locate specific categories of tickets.
1. Open the ticket list (**All tickets** or **My tickets**)
2. Open the filter options and find the **Type** filter
3. Select one or more ticket types
### Filtering Tickets by Type
Ticket Types can be used as a filtering condition to quickly locate specific categories of tickets.
1. Open the ticket list (**All tickets** or **My tickets**)
2. Open the filter options and find the **Type** filter
3. Select one or more ticket types
 ### Organizing Tickets by Type
In the ticket view, Ticket Types can be used for deeper organization:
* Sort or group by Type to keep similar tickets together
* Combine Type with other filters to create more specific views
For example:
* Type = Bug and State = Open
* Type = Feature and Substate = Backlog
Using these filter combinations, you can build views such as:
* All open bugs
* Feature requests waiting for review
### Ticket Type Statistics
The Types page provides an overview of how many tickets belong to each type. Ticket type statistics help teams:
* Identify the most frequent support categories
* Monitor product stability
* Understand customer demand
### Organizing Tickets by Type
In the ticket view, Ticket Types can be used for deeper organization:
* Sort or group by Type to keep similar tickets together
* Combine Type with other filters to create more specific views
For example:
* Type = Bug and State = Open
* Type = Feature and Substate = Backlog
Using these filter combinations, you can build views such as:
* All open bugs
* Feature requests waiting for review
### Ticket Type Statistics
The Types page provides an overview of how many tickets belong to each type. Ticket type statistics help teams:
* Identify the most frequent support categories
* Monitor product stability
* Understand customer demand
 ## Managing Ticket Substates
SeaTicket provides a standard set of ticket substates to help you manage your workflow.
The system includes several built-in substates by default:
| **Substate** | **Description** |
| :-------------- | :---------------------------- |
| New | New |
| Working on | In progress |
| Backlog | To be worked on |
| Waiting on user | Waiting on user |
| Completed | Done, closed, fixed, resolved |
| Not planned | Won't fix, can't repro, stale |
| Duplicate | Duplicate of another ticket |
### Creating and Deleting a Substate
Besides the built-in substates, admins can create custom substates to better describe the actual working stage of a ticket.
**To create a new substate:**
1. Go to the SeaTicket project workspace
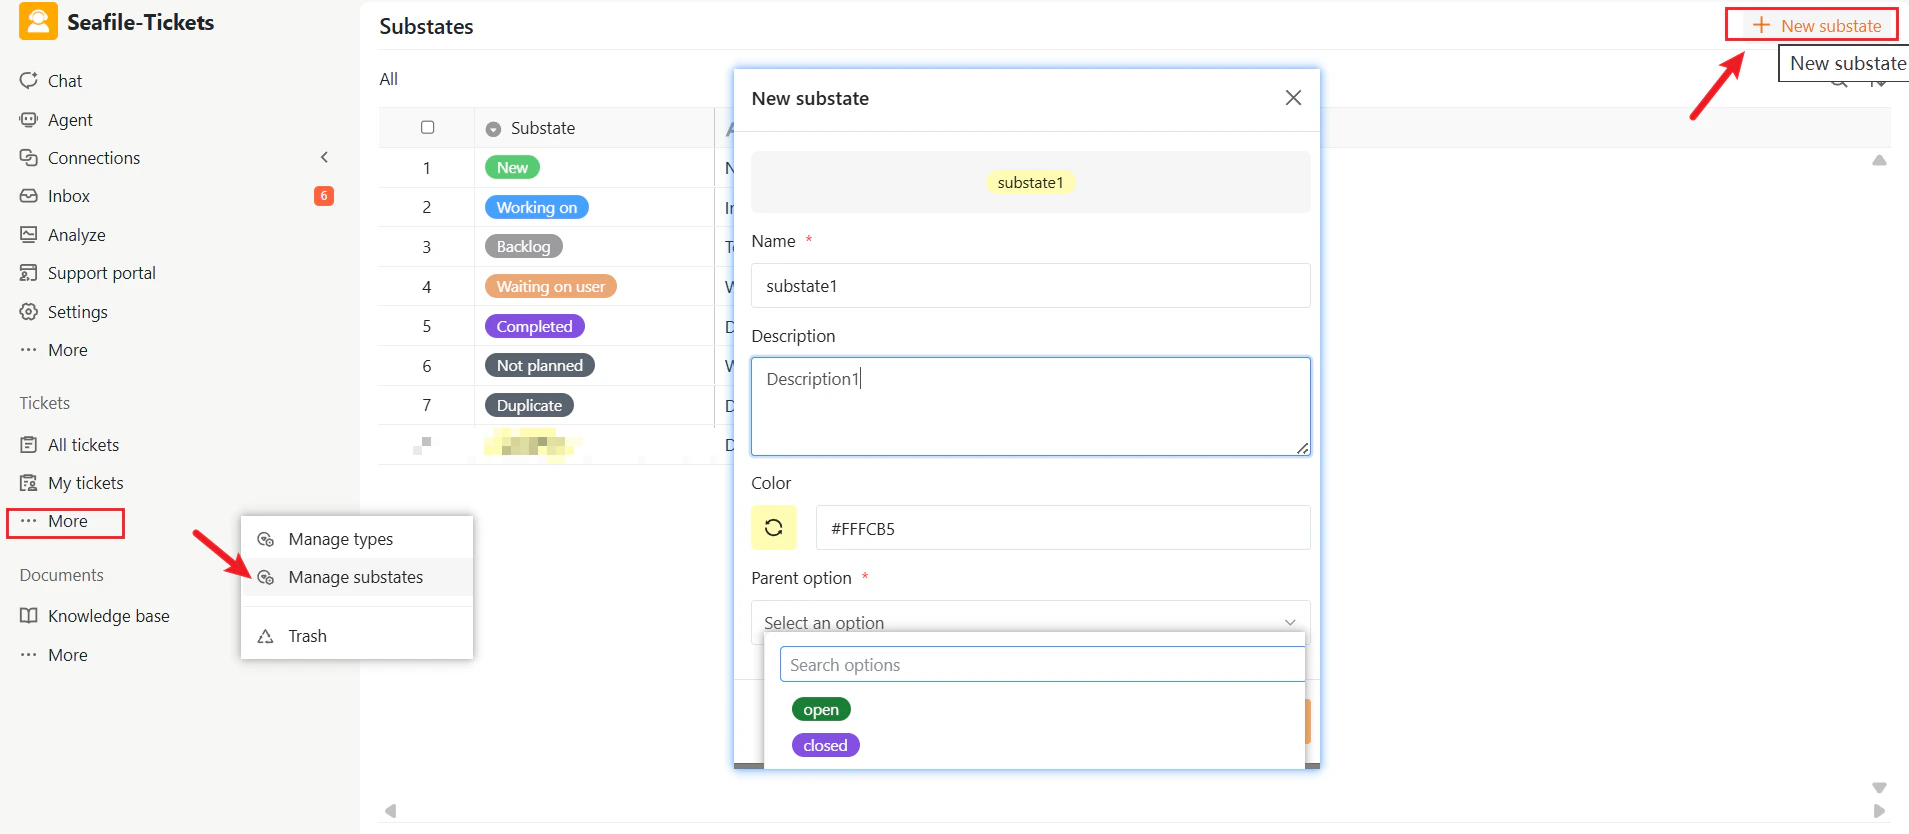
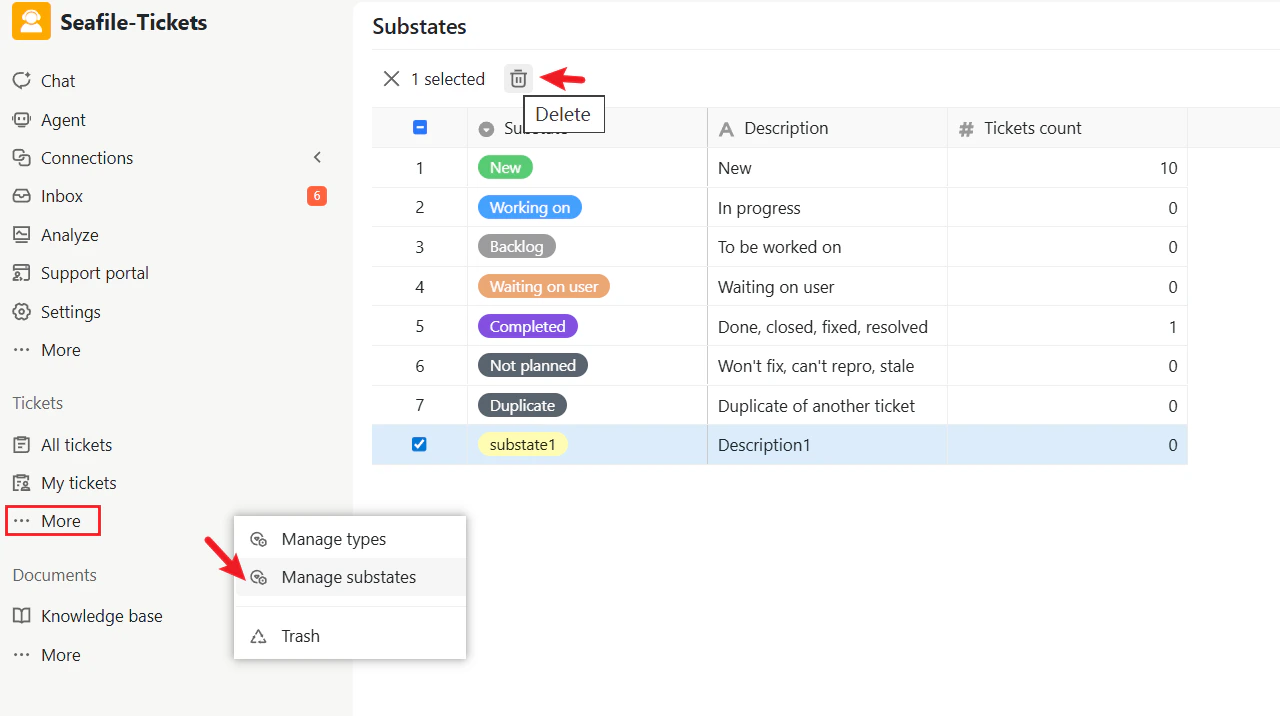
2. In the sidebar under the **Tickets** section, click **More**, then select **Manage substates**
3. Click **+ New substate**
In the pop-up window, define the following:
* **Name** – The label shown to users
* **Description** – What this substate means
* **Color** – For visual identification
* **Parent option** – Whether it belongs to Open or Closed
This allows each team to design a workflow that fits their needs.
## Managing Ticket Substates
SeaTicket provides a standard set of ticket substates to help you manage your workflow.
The system includes several built-in substates by default:
| **Substate** | **Description** |
| :-------------- | :---------------------------- |
| New | New |
| Working on | In progress |
| Backlog | To be worked on |
| Waiting on user | Waiting on user |
| Completed | Done, closed, fixed, resolved |
| Not planned | Won't fix, can't repro, stale |
| Duplicate | Duplicate of another ticket |
### Creating and Deleting a Substate
Besides the built-in substates, admins can create custom substates to better describe the actual working stage of a ticket.
**To create a new substate:**
1. Go to the SeaTicket project workspace
2. In the sidebar under the **Tickets** section, click **More**, then select **Manage substates**
3. Click **+ New substate**
In the pop-up window, define the following:
* **Name** – The label shown to users
* **Description** – What this substate means
* **Color** – For visual identification
* **Parent option** – Whether it belongs to Open or Closed
This allows each team to design a workflow that fits their needs.
 **To delete a type:**
You can delete substates that are not applied to any active tickets.
1. Select one or more substates from the list
2. Click the Delete (trash) icon at the top
**To delete a type:**
You can delete substates that are not applied to any active tickets.
1. Select one or more substates from the list
2. Click the Delete (trash) icon at the top
 ### Assigning a Substate to a Ticket
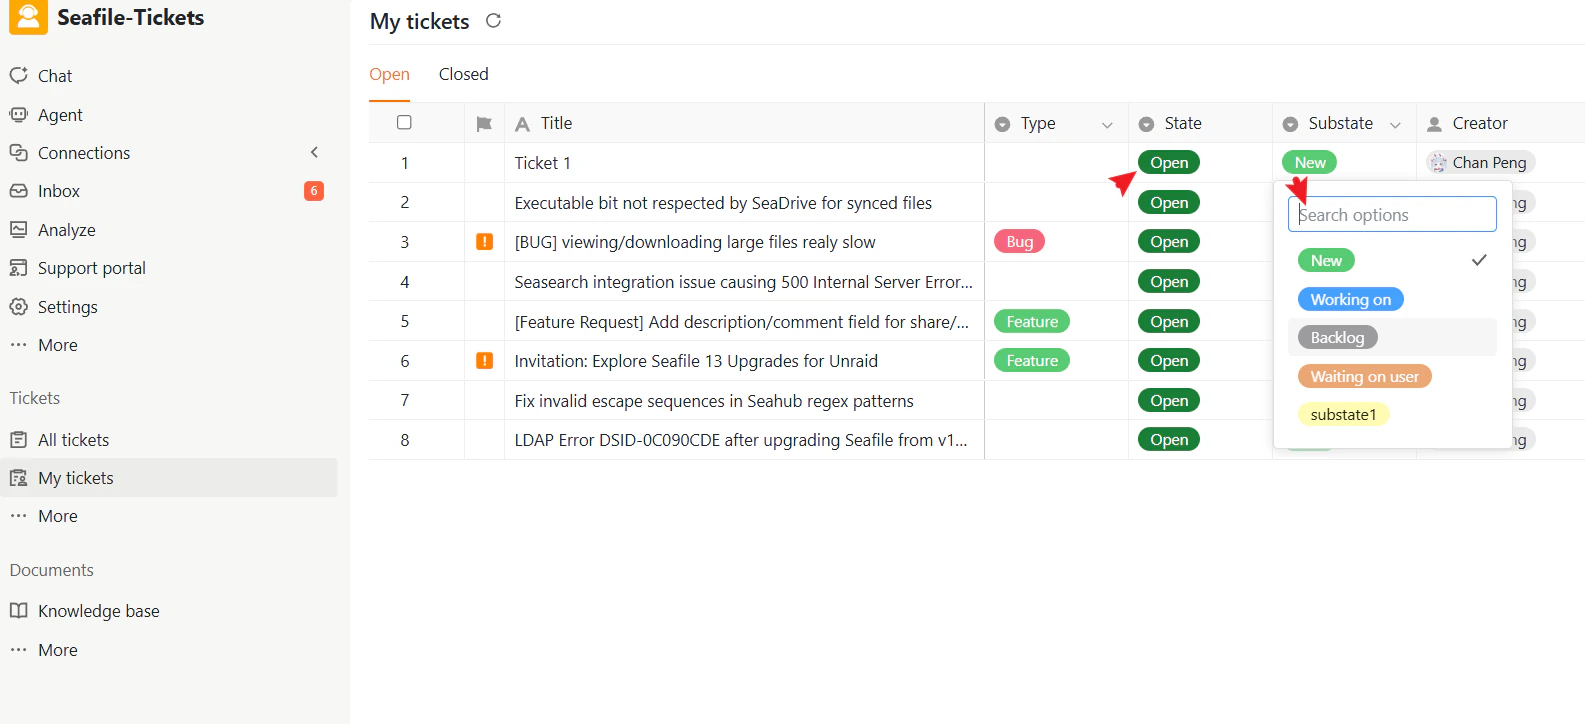
For each ticket, you can select a substate directly in the ticket list or ticket detail page.
1. First, select whether the ticket belongs to **Open** or **Closed**
2. Then, choose the substate within that category
This allows users to clearly identify the current status of each ticket.
### Assigning a Substate to a Ticket
For each ticket, you can select a substate directly in the ticket list or ticket detail page.
1. First, select whether the ticket belongs to **Open** or **Closed**
2. Then, choose the substate within that category
This allows users to clearly identify the current status of each ticket.
 ### Filtering Tickets by Substate
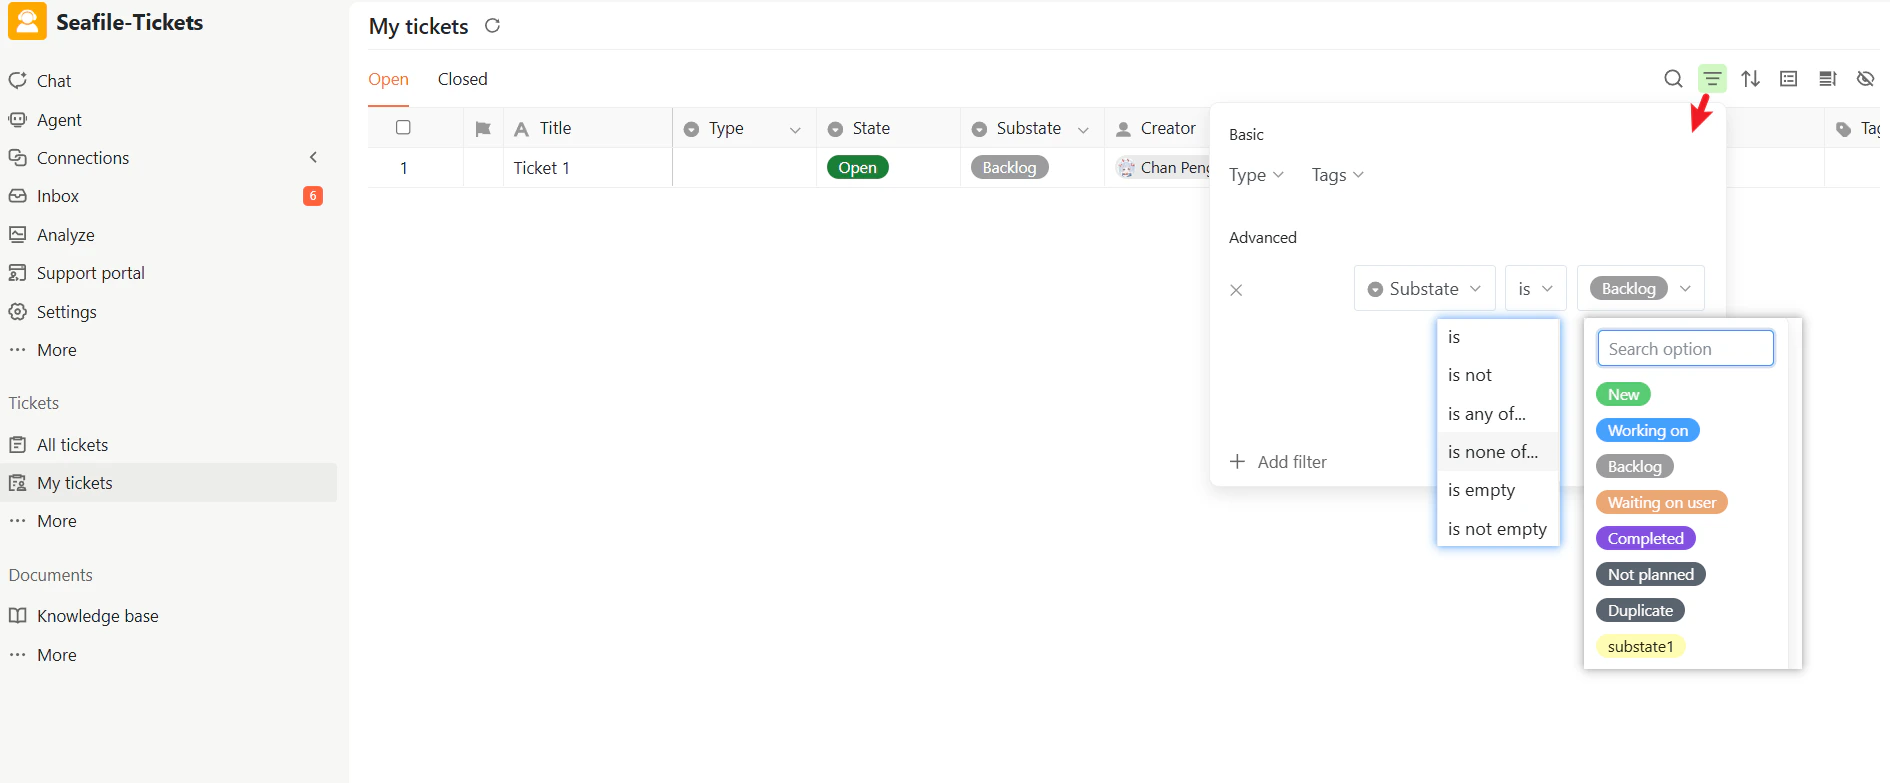
You can use substates to quickly search for and filter tickets.
**To filter tickets by substate:**
1. Open the ticket list (**All tickets** or **My tickets**)
2. Click the Filter icon in the top-right corner
3. In the filter panel, select **Substate**
4. Choose one or more substates from the list
For example, you can show all tickets where Substate is "Waiting on user," find all "Backlog" tickets, or view only "Completed" tickets.
### Filtering Tickets by Substate
You can use substates to quickly search for and filter tickets.
**To filter tickets by substate:**
1. Open the ticket list (**All tickets** or **My tickets**)
2. Click the Filter icon in the top-right corner
3. In the filter panel, select **Substate**
4. Choose one or more substates from the list
For example, you can show all tickets where Substate is "Waiting on user," find all "Backlog" tickets, or view only "Completed" tickets.
 ### Organizing Tickets by Substate
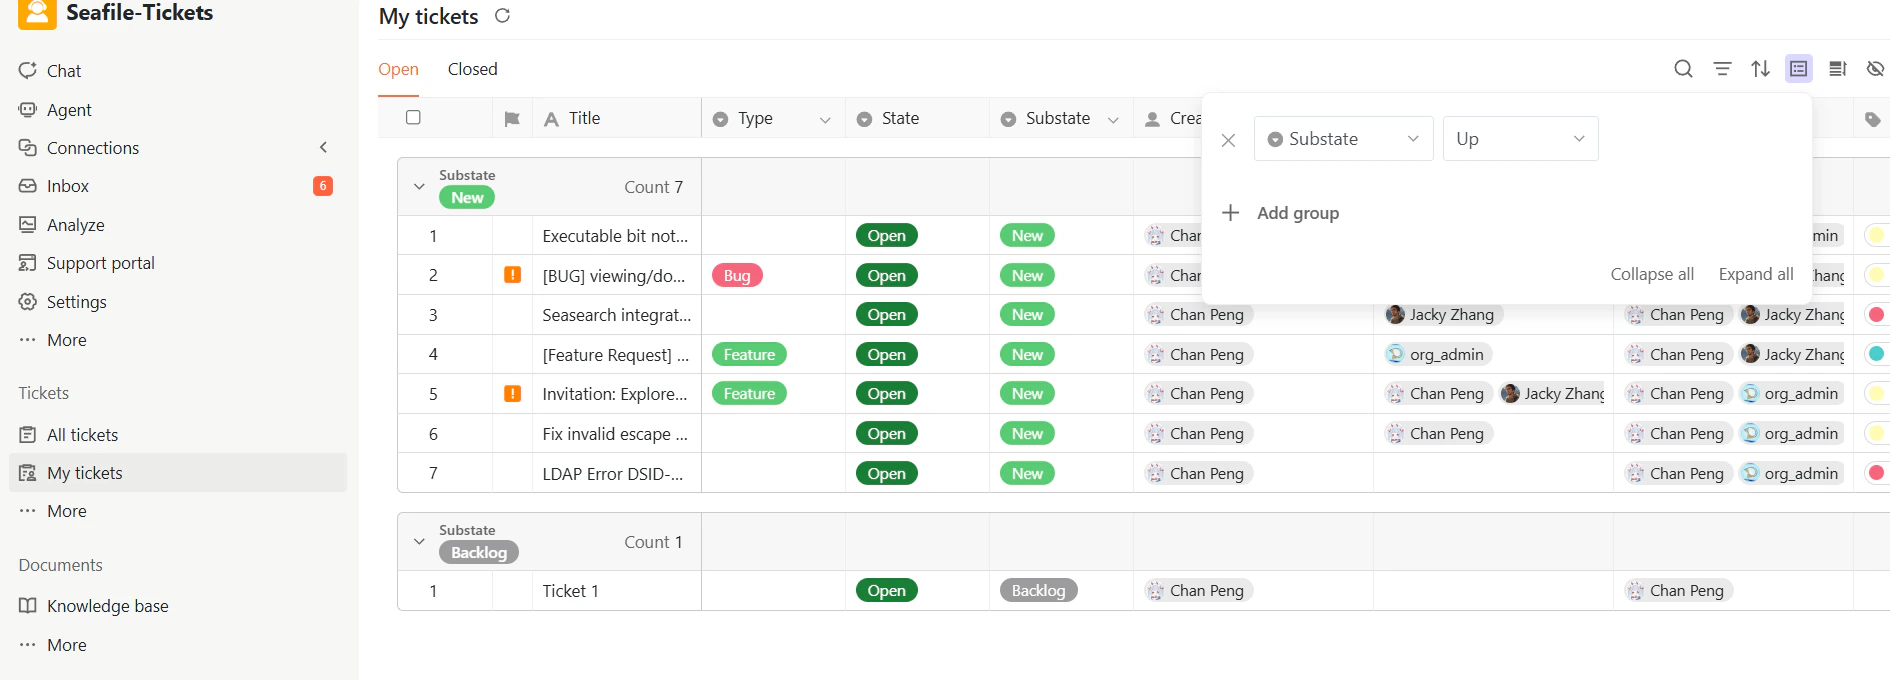
Substates support sorting and grouping, allowing you to organize tickets by their working stages and get a clearer overview of progress.
**To organize tickets by substate:**
1. Open the ticket list (**All tickets** or **My tickets**)
2. Click the View options icon in the top-right corner
3. Choose **Substate** as the grouping or sorting field
Tickets will be automatically grouped or ordered by substate.
### Organizing Tickets by Substate
Substates support sorting and grouping, allowing you to organize tickets by their working stages and get a clearer overview of progress.
**To organize tickets by substate:**
1. Open the ticket list (**All tickets** or **My tickets**)
2. Click the View options icon in the top-right corner
3. Choose **Substate** as the grouping or sorting field
Tickets will be automatically grouped or ordered by substate.
 ### Substate Statistics
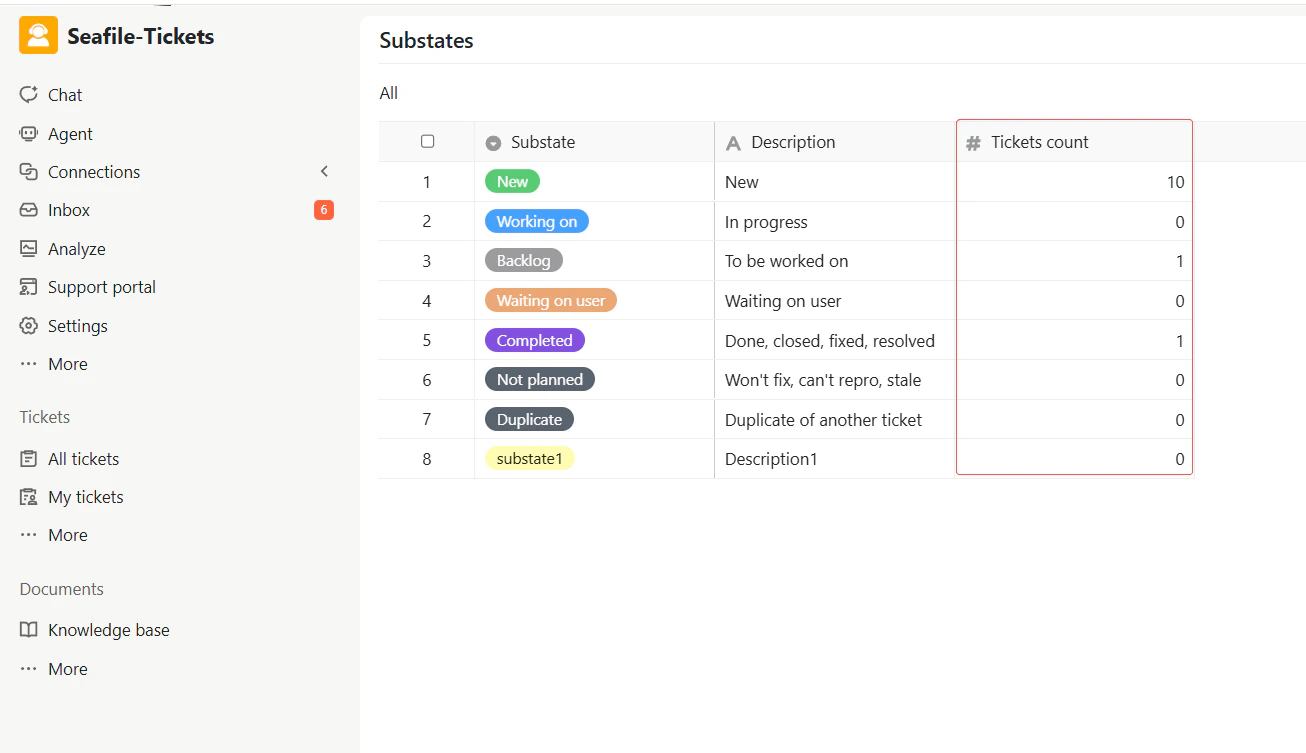
The Substate statistics panel displays the number of tickets in each working stage, giving you quick visibility into workload distribution and workflow health.
### Substate Statistics
The Substate statistics panel displays the number of tickets in each working stage, giving you quick visibility into workload distribution and workflow health.
 ## Managing Tags
Tags are keywords or short phrases that add context to tickets. They help you categorize and organize tickets by topic, priority, product, issue type, or any other criteria that supports your workflow.
Tags make it easier to:
* Classify tickets consistently
* Search and filter tickets quickly
* Identify patterns and trends
* Keep your workflow organized
Responders can add, remove, and search tickets by tags at any time.
### Creating and Deleting Tags
To keep tagging consistent, create a preset tag library that responders can select from when working on tickets.
**To create a tag:**
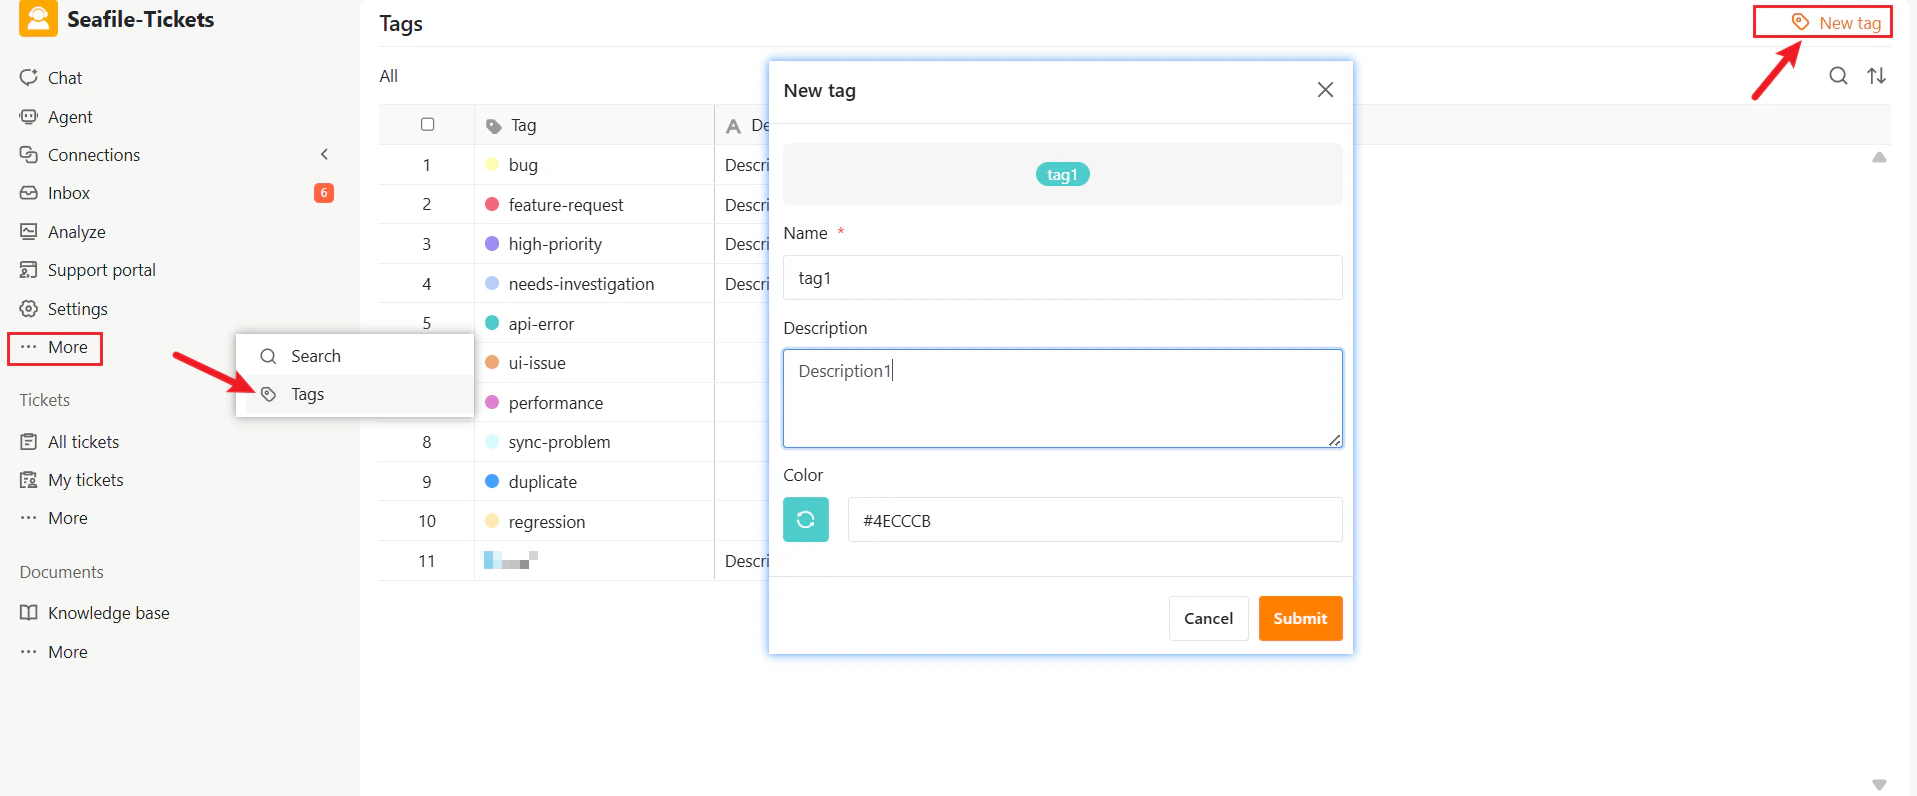
1. Navigate to the **Tags** section by clicking **More** in the left sidebar
2. Click **+ New tag** in the top-right corner
3. In the pop-up window, fill in the following details:
* **Name** – The tag name
* **Description** – A short explanation of when to use this tag
* **Color** – A color label for visual identification
The new tag will appear in the tag list and can be applied to tickets immediately.
## Managing Tags
Tags are keywords or short phrases that add context to tickets. They help you categorize and organize tickets by topic, priority, product, issue type, or any other criteria that supports your workflow.
Tags make it easier to:
* Classify tickets consistently
* Search and filter tickets quickly
* Identify patterns and trends
* Keep your workflow organized
Responders can add, remove, and search tickets by tags at any time.
### Creating and Deleting Tags
To keep tagging consistent, create a preset tag library that responders can select from when working on tickets.
**To create a tag:**
1. Navigate to the **Tags** section by clicking **More** in the left sidebar
2. Click **+ New tag** in the top-right corner
3. In the pop-up window, fill in the following details:
* **Name** – The tag name
* **Description** – A short explanation of when to use this tag
* **Color** – A color label for visual identification
The new tag will appear in the tag list and can be applied to tickets immediately.
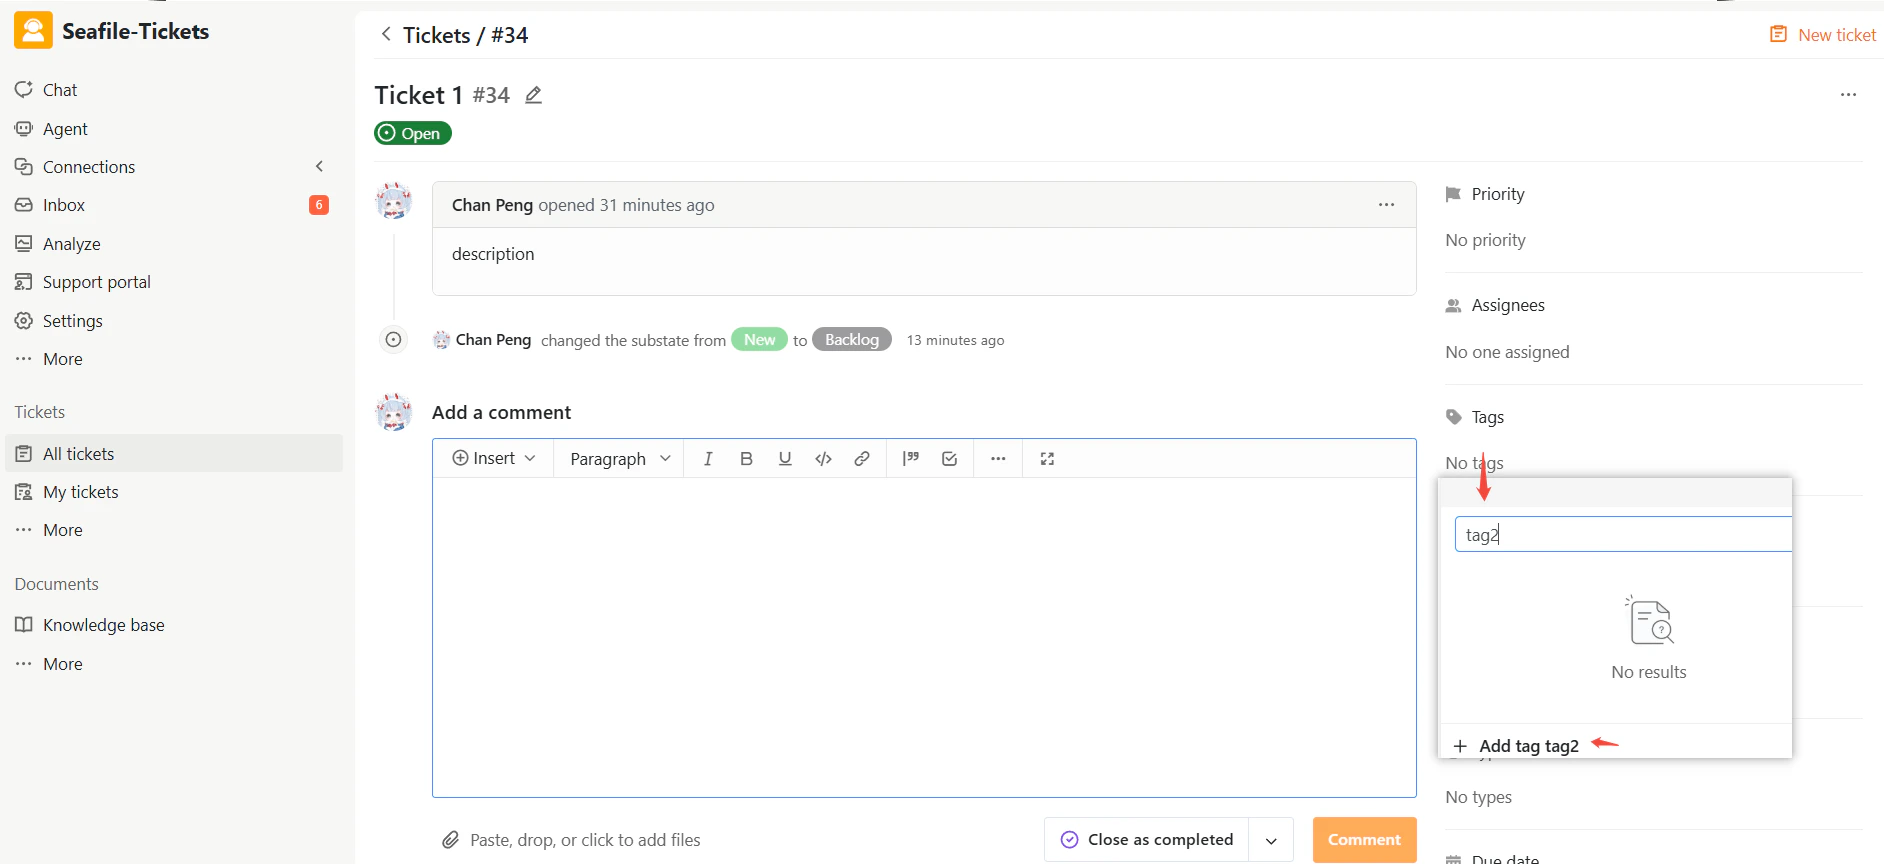
 Responders can also create new tags directly from the ticket details page while working on a ticket. Any tag created this way will automatically sync back to the main tag library, making it easy to expand your tagging system as new needs arise.
 **To delete a tag:**
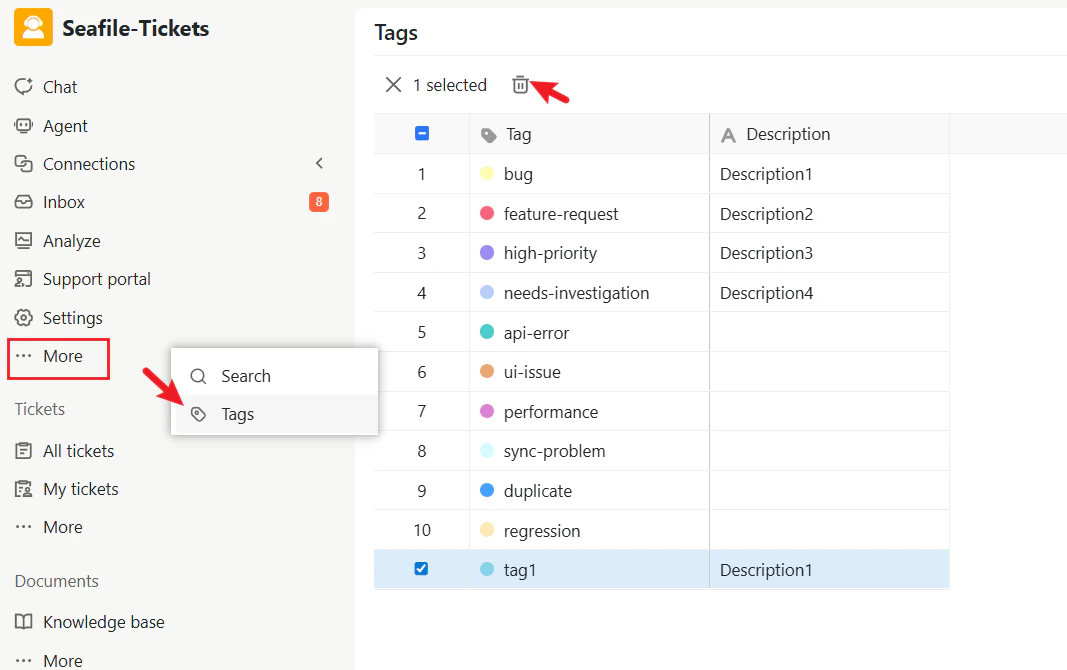
1. Select one or more tags from the list
2. Click the Delete (trash) icon at the top
**To delete a tag:**
1. Select one or more tags from the list
2. Click the Delete (trash) icon at the top
 ### Adding Tags to Tickets
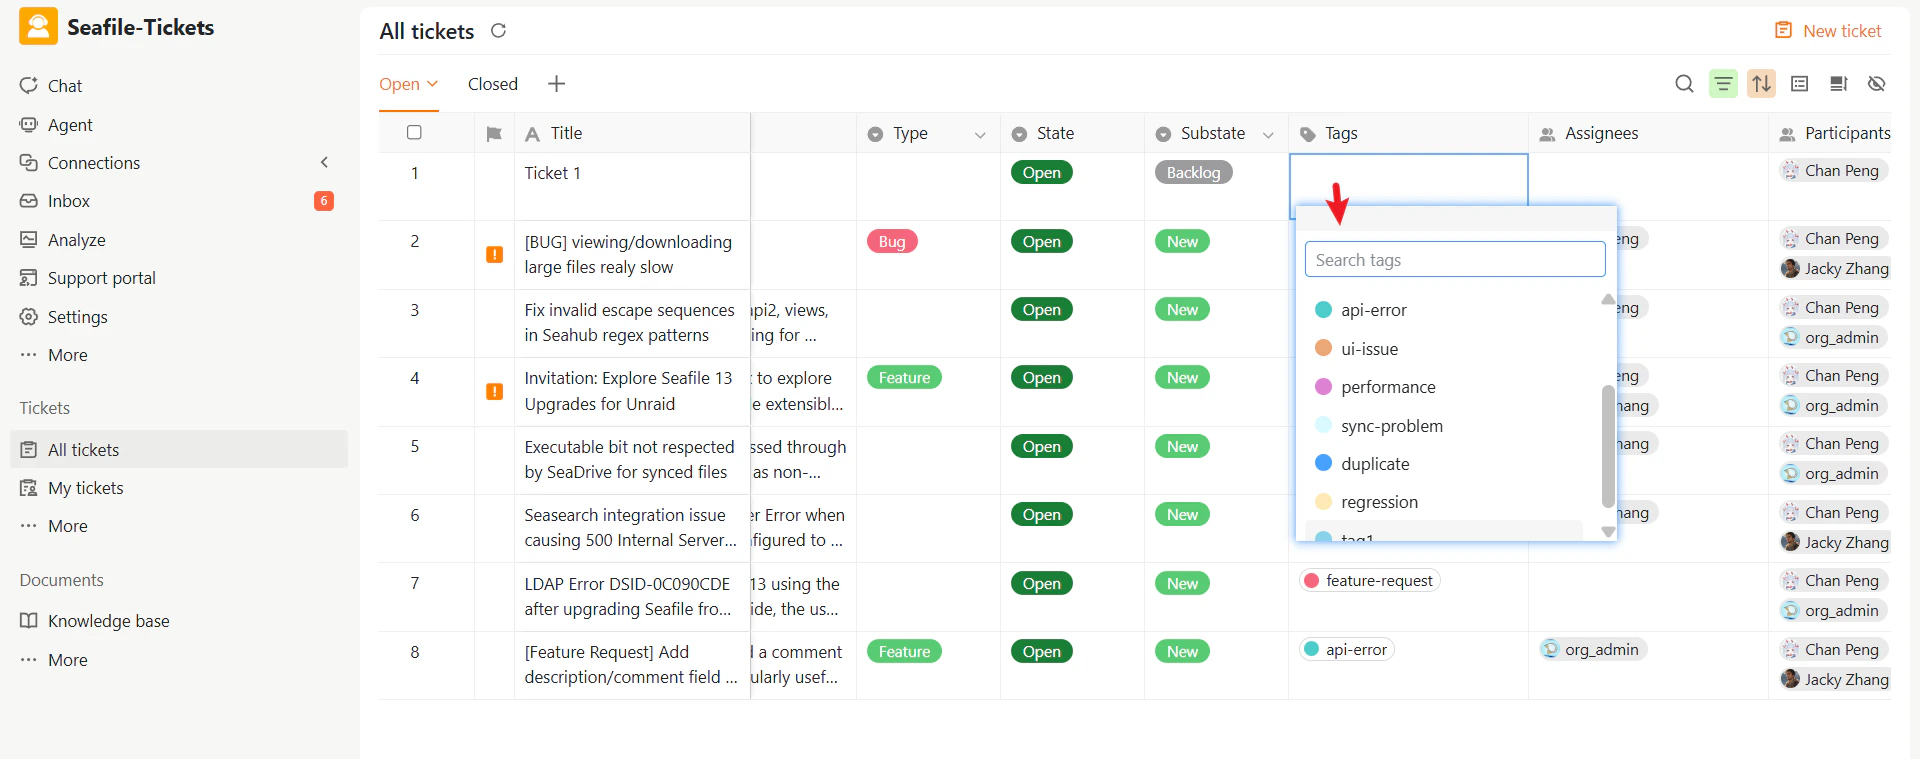
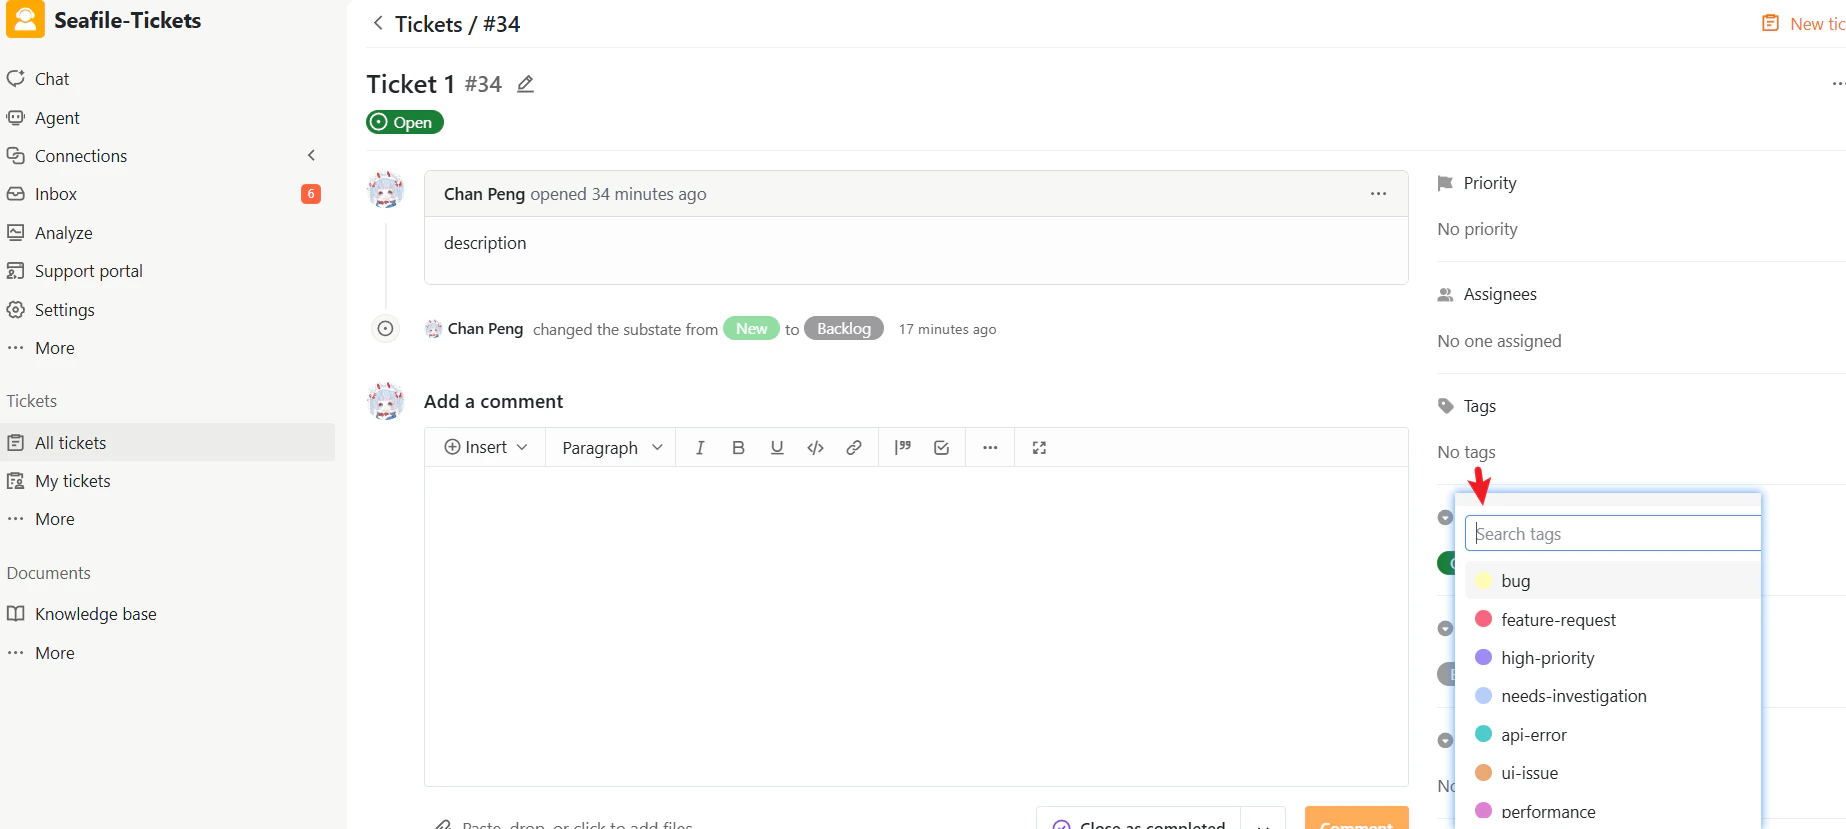
Responders can manually add tags to tickets from either the ticket view or the ticket details page.
### Adding Tags to Tickets
Responders can manually add tags to tickets from either the ticket view or the ticket details page.
 ### Filtering Tickets by Tags
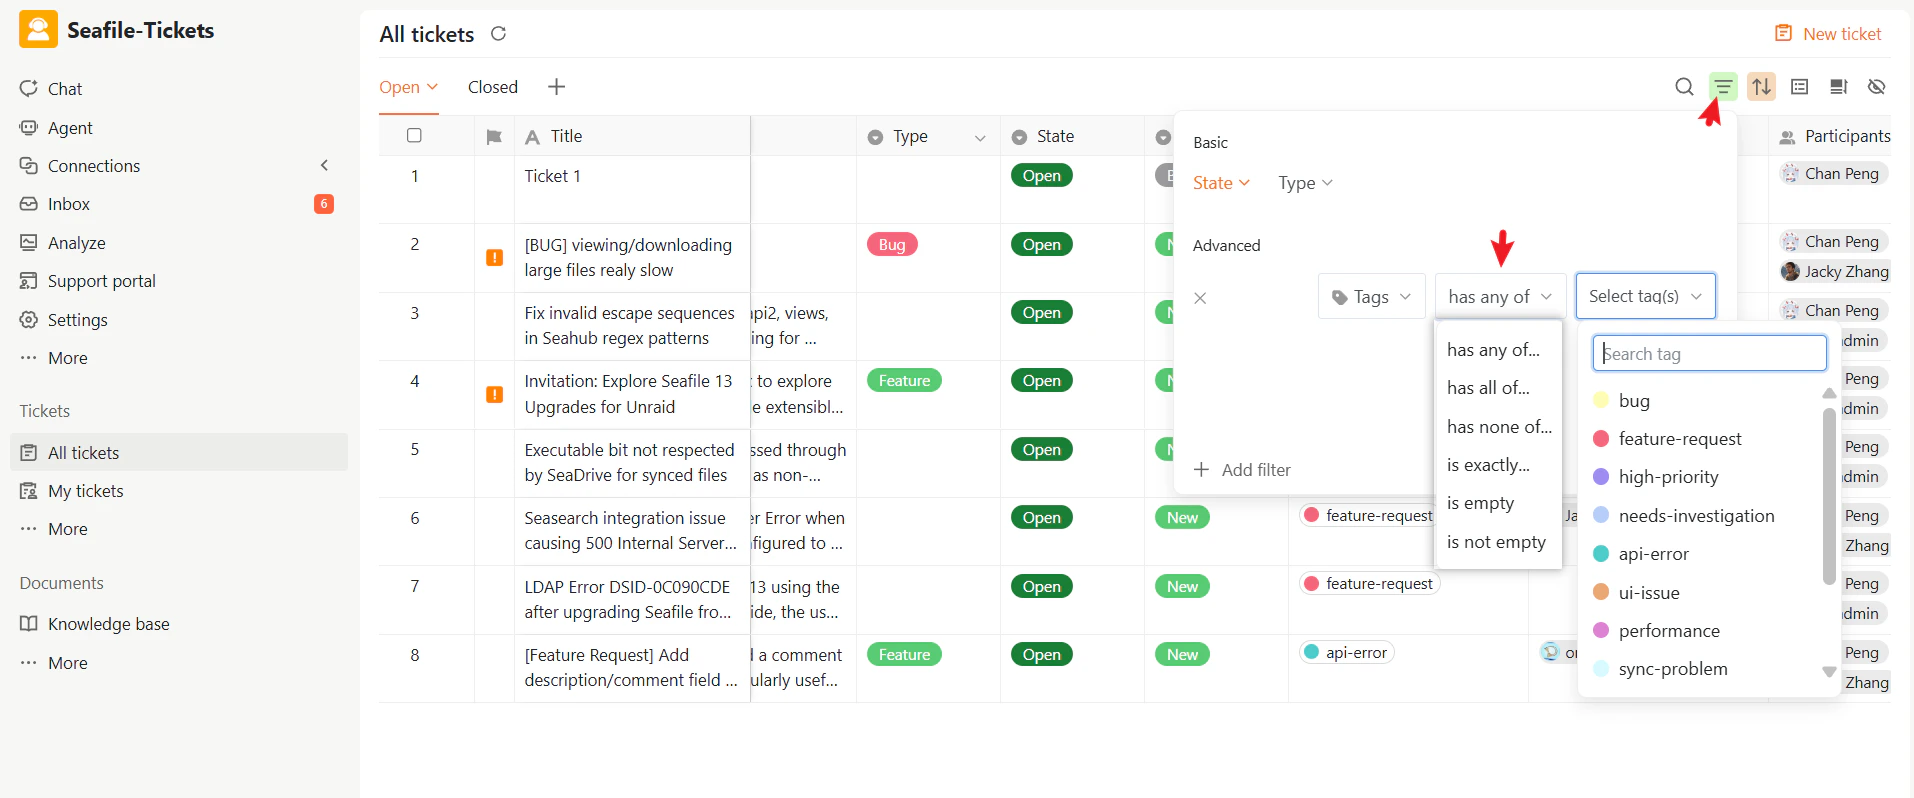
You can add tags as filter conditions to quickly view all tickets that contain specific tags.
1. In the ticket view, click the Filter icon
2. Add a **Tags** condition and select one or more tags
3. Apply the filter
The ticket list updates instantly to show matching results. You can combine tag filters with other conditions (such as status, assignee, or priority) for more refined views.
### Filtering Tickets by Tags
You can add tags as filter conditions to quickly view all tickets that contain specific tags.
1. In the ticket view, click the Filter icon
2. Add a **Tags** condition and select one or more tags
3. Apply the filter
The ticket list updates instantly to show matching results. You can combine tag filters with other conditions (such as status, assignee, or priority) for more refined views.
 ### Organizing Tickets by Tags
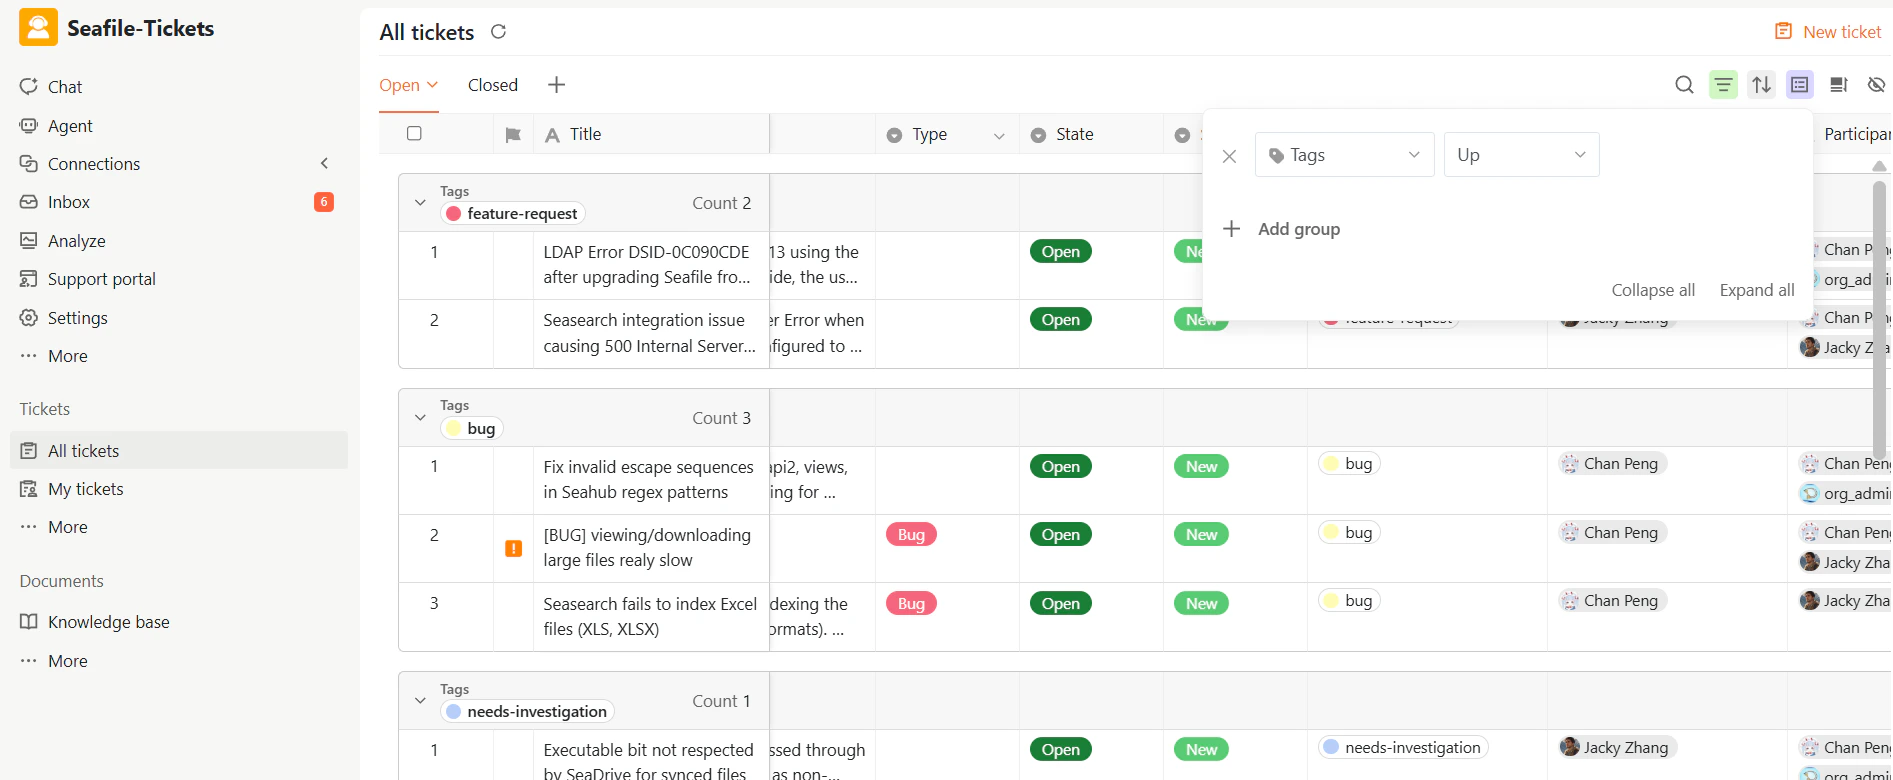
In addition to filtering, tags help you visually organize your ticket list.
**To group or sort by tags:**
1. In the ticket view, click the View Options icon in the top-right corner
2. Choose **Tags** as the grouping or sorting field
Tickets will automatically be grouped or ordered based on their assigned tags, giving you a clearer overview of related issues
### Organizing Tickets by Tags
In addition to filtering, tags help you visually organize your ticket list.
**To group or sort by tags:**
1. In the ticket view, click the View Options icon in the top-right corner
2. Choose **Tags** as the grouping or sorting field
Tickets will automatically be grouped or ordered based on their assigned tags, giving you a clearer overview of related issues
 ### Best Practices for Tag Management
To keep your tagging system effective:
* Keep tag names short and consistent
* Avoid creating duplicate or overly similar tags
* Use descriptions to clarify intended usage
* Periodically review and clean up unused tags
A well-structured tagging system improves visibility, reporting, and overall workflow efficiency.
### Best Practices for Tag Management
To keep your tagging system effective:
* Keep tag names short and consistent
* Avoid creating duplicate or overly similar tags
* Use descriptions to clarify intended usage
* Periodically review and clean up unused tags
A well-structured tagging system improves visibility, reporting, and overall workflow efficiency.